I have read some good things about memcache and apparently facebook uses it, so thought it must be fairly decent.
I wanted to test it out on one of my WordPress sites which is hosted on one of my dedicated servers running WHM/Cpanel.
Lets Go!
1. Install MemCache onto your Cpanel server
# yum install memcached

# service memcached start

# pecl install memcache

# service httpd restart
2. Make memcache run even after reboots
# chkconfig --levels 235 memcached on
3. Check to see if memcache is running
# php -m | grep memcache

4. Integrate memcache into your WordPress site
a. Grab the wordpress plugin from here: https://wordpress.org/plugins/memcached/
WARNING – DO NOT INSTALL THE PLUGIN THROUGH WORDPRESS
YOU HAVE TO MANUALLY UPLOAD THE PLUGIN FILE THROUGH FTP OR A FILE MANAGER
c. Upload object-cache.php file to your /wp-content folder
d. Add the following lines to the bottom of your wp-config.php file
global $memcached_servers;

$memcached_servers = array('default' => array('127.0.0.1:11211'));
THATS IT! memcache should now be working with your WordPress site!
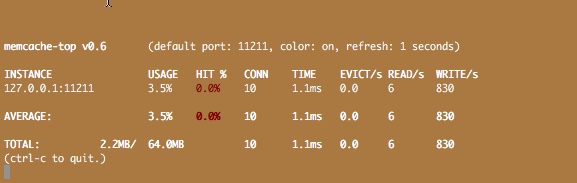
If you want to confirm that memcache is working and see live stats, you will need to install memcache-top to your server, read the instructions below.
1. Download memcache-top source files
a. Grab the source files from: http://code.google.com/p/memcache-top/
b. In the downloaded file you will find memcache-top-v0.6 (without extension)
c. Rename it to memcache-top
d. Upload memcache-top to your server, like in /root
2. Run SSH command to monitor memcache
To run update every second run the following command (assuming you installed it to /root)
/root/memcache-top --sleep 1
Just change the numeric value to 5 for 5 second interval, 10 for 10 second interval etc.
Additional memcache commands
Restart memcache: # service memcached restart
Edit memcache config file: # pico /etc/init.d/memcached